Wednesday, December 19, 2012

Christmas Cranberry Mocktail or Cocktail


Being in the festive spirit and noticing the fresh cranberries available...I started wondering what I kind of drink I could possibly make.  I trolled Pinterest, but everything looked hard and required way too many weird liquors.  Watching an old episode of Ina inspired me.  These are festive and taste GREAT!

Tips I learned when making a Christmas Cranberry Mocktail/Cocktail:

  • Put a spoon in your glass when adding ice and liquid. It will prevent the ice from sticking together.
  • Add a green sugar rim to make festive. You can find green sugar in your baking aisle.


Christmas Cranberry Mocktail/Cocktail

1 cup of fresh cranberries
1/2 cup of sugar
1/2 cup of water
Sprite Zero or Diet 7UP
Ice
Apple Vodka (if making cocktail)

Combine sugar and water in sauce pan over medium heat. Add all cranberries but 2.  Allow to simmer or boil very slowly until cranberries begin to burst.  Once all cranberries are burst, continue to simmer for 2-3 minutes. Remove from heat and slightly mash berries to make a syrupy liquid.  Allow to cool.  Add 1 teaspoon of the cranberry mixture to tall glass.  (Add apple vodka to taste and mix if making cocktail.)  Add ice to the rim and fill with soda.  Add the 2 fresh berries on top to garnish.  Serve immediately.

Crackie Crackers

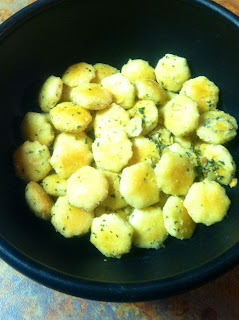
In the midst of trolling Pinterest, I found this recipe. OMG!  After making and eating 1/2 the batch in one setting, I named them Crackie Crackers.  They are addicting.  If you are a savory/salt loving fiend, like I am, step away from this recipe now. Trust me, you will tell yourself you won't eat any and will give them away as gifts...but as soon as these warm little menaces come out of the oven - BAM!  The next words out of your mouth are "My Precious!"  ENTER AT YOUR OWN RISK!

Ps. Easy and cheap to make tons for parties!


Crackie Crackers:
1 bag of Oyster Crackers
1 package of Hidden Valley Ranch Seasoning
1/4 cup of Canola Oil
2 teaspoons of garlic power (to taste)

Heat oven to 250 degrees.  Mix the oil and seasonings well.  Add crackers and thoroughly coat by mixing.  Transfer crackers to baking/cooking pan.  Cook for 10-15 minutes, shaking/tossing crackers every 5 min.  Serve immediately or store in zip lock bag once cooled.

Tuesday, December 18, 2012

Garlic Chicken with Asparagus and Mushrooms

I found this recipe on the Calorie King website. I was searching for new low carb meals, as my menu tends to be the same week after week.  It was a HIT!  I made a few changes. This is a meal that you can really change to suit your taste.  We will definitely be making this again, soon.

Tips I learned while making Garlic Chicken with Asparagus and Mushrooms:

  • I buy frozen chicken breasts and defrost the amount I need each day.  They are super easy and budget friendly.
  • Freezer bags are great for defrosting any meat.  They allow you to season in the bag if need be.
  • When pounding chicken breasts flat, keep them in the freezer bag. This prevents any splatters and keeps your mallet clean.
  • Who needs a tenderizing mallet when you have a good can of veggies. Anything sturdy and heavy works fine.
  • Never rinse your mushrooms in water. Mushrooms are like sponges.  They will absorb the water and lose their flavor.  Simply use a moist paper towel and wipe clean.
  • Make sure to cut the ends of your asparagus. They can be tough. If really large, you can also peel your asparagus down until you get to the tender portion.
  • Be careful when handling jalapenos. Small plastic baggies make great gloves in a pinch.
  • Soak your toothpicks in water before using. This prevents them from burning.


Garlic Chicken with Asparagus and Mushrooms 

2 boneless, skinless chicken breasts, cut in half (1 lb total)
10 fresh asparagus spears (not canned)
1/2 tsp salt
1 tsp pepper
1/2 lb sliced Button mushrooms
2 tablespoons of garlic
1/2 jalapeno, julienned
1/2 teaspoon of Cayenne Pepper
Olive Oil

Directions:

Pre-heat oven to 375°F.

Pound the chicken breasts flat.  Season with cayenne, salt and pepper.

Lay five asparagus spears and jalapenos across each chicken breast. Roll chicken over the asparagus and insert a tooth pick to secure the edge. Lightly season with salt and pepper.  Drizzle with olive oil.

Place in baking dish. Cover with sliced mushrooms and garlic cloves. Drizzle again with olive oil.  Bake in preheated oven for 30 minutes. 

Sunday, November 11, 2012

Firecrackers

This recipe is about as easy at it gets. In the past, we would buy them pre-made at Market Street. (They put shrimp in theirs.)  Heath was sure we could make them ourselves.  After a few test runs, I think we got them right.

We love them in the winter, because the heat of the jalapenos warms you right up. You can experiment with the stuffings.  As always, whatever suits your taste!

What I learned when making Firecrackers...

  • I like to use really large jalapenos.  I believe this size must be seasonal, as I have been able to find them just recently.
  • Cream cheese is great, because it does not "run" out like other cheese.
  • Use good, center cut bacon. You want the crispy bacon, not the fat that doesn't cook well.
  • Line your grill grate with foil. This will prevent the bad flair ups from the bacon grease.  We like to keep a spray water bottle nearby, just in case.
  • Soak your toothpicks in water. This will help slow the burn on the grill.
  • Wear gloves when cutting jalapenos. Your eyes will thank you later.  If you want more spice, leave some of the seeds.

Recipe for Firecrackers:

Ingredients
3-4 extra large jalapenos (4 inches in length)
Cream Cheese
Center Cut Bacon
Toothpicks

Cut jalapenos length wise in half. Scoop out seeds.  Stuff each side with cream cheese.  Marry the halves again and wrap with bacon.  Use toothpicks to secure.  Grill until bacon is crispy.  Serve immediately.

Bacon Wrapped Jalapeno Chicken "Bites"

We tasted an awesome recipe at Mattito's in Frisco.  In hopes of trying to duplicate it, I went to....Pinterest.  Surprise, surprise....I know.  These are great as appetizers or the main meal.

Tips I learned when making Bacon Wrapped Jalapeno Chicken "Bites":


  • I used chicken breasts.  You can pound or flatten your chicken before cutting into strips.  We did not pound this time, but I may in the future to make more room for stuffing.
  • When cooking on the grill, use foil over your grate. The bacon really fires up, so watch carefully.  We like to keep a spray water bottle near by.
  • Any type of pepper would work.  Use what you like best.  I used an anaheim pepper.
  • Use good center bacon. You want crispy bacon, not lots of fat.  We used the center cut and did not have to cut down the bacon. I used about 2 strips per each piece of chicken.
  • Use plastic gloves when cutting peppers. Your eyes will thank you later.
  • Soak your wooden toothpicks in water. This will slow down the burning on the gril.


Bacon-Wrapped Jalapeno Chicken Bites

original recipe: http://www.salad-in-a-jar.com/family-recipes/bacon-wrapped-jalapeno-chicken-bites

Ingredients:
8 chicken tenders, flattened and cut in two
3-ounce package softened cream cheese
1 jalapeno pepper, seeded and finely chopped
8 slices bacon, cut in half

Instructions:

1. Dab 1/2 teaspoon (more or less) of cream cheese on top of each chicken tender. Sprinkle a scant 1/4 teaspoon of peppers over cream cheese. Fold or roll chicken to enclose cream cheese mixture. Wrap each roll with one piece of bacon and secure with a toothpick.
2. Grill until bacon is brown and crispy on both sides.


Hummus Cookie Dough Dip

I love Pinterest!  My husband makes fun of me, because every time he asks where I get a new recipe or craft idea....I say PINTEREST!  I will admit some of the "things" I have tried have been complete failures.  However, sometimes I am pleasantly surprised. This recipe would fall in the win column.

Every now and then I get a taste for all things cake and cookies.  I will munch on whatever I can find only to feel guilty later.  Not today because I found a dessert made of beans!!  Yes, you heard me right....beans as a dessert. Who would have thought?

Tips I learned when making Hummus Cookie Dough Dip:


  • Make sure to drain and rinse your chickpeas well.
  • This is a rich dessert, a little goes a long way.
  • You can use anything to as dippers...I chose Cinnamon Graham Dippers.
  • The recipe calls for regular size chocolate chips, I chose mini's instead. 
  • You can replace the brown sugar with stevia.  You will get a different flavor, so do a test run before making for a crowd.
  • I used almond butter as my "nut" butter. 
  • I used the chocolate chips as garnish and put them on last, right before you serve.

Cookie Dough Dip by Chocolate Covered Katie...all credit to her!
  • 1 1/2 cups chickpeas or white beans (1 can, drained) (250g)
  • 1/8 tsp plus 1/16 tsp salt
  • tiny bit over 1/8 tsp baking soda
  • 2 tsp pure vanilla extract
  • 1/4 cup nut butter (You can get away with using only 3 tbsp. If you use peanut butter, it’ll have a slight “pb cookie dough” taste, so if you don’t want this, try the recipe in this link instead. Just don’t bake it.)
  • up to 1/4 cup milk of choice, only if needed
  • 2/3 cup of brown sugar
  • 1/3 cup chocolate chips
  • 2 to 3 tbsp oats (or flaxmeal) (You can omit for a thinner dip.)
Add all ingredients (except for chocolate chips) to a good food processor (not blender), and blend until very smooth. Then mix in the chocolate chips.  (Some commenters have had success with a blender, but I did not. Try that at your own risk, and know the results will be better in a high-quality food processor such as a Cuisinart.)
Top with chocolate chips and serve with dippers.

Sunday, October 7, 2012

Chicken Tortilla Soup

I have really been slacking in my posts, but you must trust that I am still cooking. :)  Heath and I have been working on our health for almost 1 year now. He is down 30lbs and I am down 2 sizes and 25lbs. Huge improvements to our cholesterol and high blood pressure readings. WE ARE IN NORMAL RANGES!!

As fall is upon us in Texas, the 100 degree days have been replaced with crisp, cool breezes.  It is during this time that we not only put on coats, but can put on extra weight to keep us warm.  I am trying to think outside the cold and empty calories to delicious, comforting, and waist pleasing food.

I found the following recipe years ago via Emeril and the Food Networks. I tweaked it a bit and made it a family favorite. Feel free to let your creative juices flow and make this a fall family tradition of your own.

Tips I learn while making Chicken Tortilla Soup:
  • Wear protective gloves or sandwich bags over your hands when cutting jalapeno peppers. Your eyes will thank you later.
  • If you are out of tomato paste for a soup, ketchup can serve as a substitute.
  • Don't be afraid of canned chicken. When combined in a large soup, you won't notice the difference. 
  • Be careful when using cilantro. A little goes a long way.  Put a little in first and gradually add until it suites your taste.
  • Make sure you take the time to simmer the ingredients.  1-2 hours will make a difference in the flavors and allow them to truly blend together.
  • Feel free to try different peppers. Also, add more if you like your soup spicy!
  • If you want to cut calories, skip the sour cream, corn chips and use fat free cheese.


INGREDIENTS

2 tablespoons olive oil
1 cup chopped onions
2 teaspoons chopped garlic
1 poblano pepper, seeded and chopped, or 1 pasilla or green bell pepper
1 jalapeno pepper, seeded and chopped
1 can of yellow hominy
1 1/2 teaspoons salt
1 1/2 teaspoon ground cumin
1/2 teaspoon ground coriander
1 tablespoon tomato paste
6 cups chicken stock or canned, low-sodium chicken broth
1 pound cooked or canned chicken, shredded
1/4 cup chopped fresh cilantro
2 teaspoons fresh lime juice
1 avocado, peeled, seeded, and chopped, optional garnish
Sour creme and shredded cheese for garnish
1 bag of blue tortilla chips

DIRECTIONS

1.  In a Dutch oven or large heavy pot, heat the oil on medium-high heat. Add the onions, garlic, peppers, salt, cumin, and coriander for 5 minutes. Add the tomato paste and cook, stirring, for 1 minute. Add the chicken stock and hominy and bring to a simmer. Simmer for 20 minutes. Add the chicken and simmer for 5 minutes. Add the cilantro and lime juice, and stir well. Remove from the heat and cover to keep warm. May simmer on stove top or in Crock Pot for several hours.
2.  Place chips and sliced avocados in bowl. Ladle the soup over. Garnish each serving with cheese and sour cream.

Sunday, July 22, 2012

Black Bean Salsa

Well the good news is my cholesterol did DROP!  LDL - 111, TriG's - 190, HDL - 37.  I still have a way to go, but that is leaps and miles over the 450 just 6 weeks ago.


This dip came out of a request from my husband. We found these great Jalapeno Pretzel Crisps at our local Target.  He took the pretzels to work. A co-worker said they would go great with bean/salsa dip.  I searched for the initial recipe on Allrecipes.com and went to work.  ( I heart that site! ) 


We now make this weekly. It is a perfect summertime dip. We even take it in the cooler to the pool. It is refreshing and literally tastes like you are eating nachos!  The options are endless. 


Tips I learned while making Black Bean Salsa:
  • When cutting jalapenos, use gloves. If you don't have gloves, use plastic snack baggies to cover your hands while cutting. Your eyes will thank me later.
  • Use frozen corn. It keeps your dip cool if you are taking it to go.
  • Rinse your beans. Never use them straight from the can. The liquid they are kept in is full of sodium.
  • Put enough salt, pepper, lime juice and olive oil to just meld the flavors. You don't want to taste these seasonings, you just want them to bring out the flavors of the veggies.
  • This dip will keep all week and doubles easily.  It is perfect for lunches, parties and pool time snacks.
Black Bean Salsa:


  • 1 (15 ounce) can black beans, rinsed and drained
  • 1 to 1/2 bag of frozen corn
  • 1/2 cup chopped red onion
  • 1/2 cup chopped green bell pepper
  • 1-2 chopped jalapenos
  • 2 diced roma tomatoes
  • 1 chopped avocado
  • 1 bunch of chopped cilantro
  • Salt and pepper to taste
  • Lime juice to taste
  • Olive oil to taste

Chop all veggies, mix and season. Serve.

Sunday, June 10, 2012

Veggie, Bean, and Quinoa Croquette


Let's say I have had a "Change of Heart".....literally.  20lbs lighter with a reduction of red meat and daily regimen of fish oil and lecithin, I was feeling very confident at my latest doctor appointment.  Little did I know, that I was a ticking time bomb.  The call from the nurse was alarming, my cholesterol was over 450 points.  WHAT? How could this be???  Wasn't I doing everything right?  I then remembered that my dad just had a pace maker installed.  I know some people say it could be "genes", but I wasn't willing to take that for an answer.

I Googled everything I could on lowering cholesterol naturally.  Friends pointed me to the movie, Knifes Over Forks.  I highly recommend it!!  I then remembered how thin I was in school.  What was I doing then?  VEGGIES! I was a huge vegetable eater.  Time to go back to what worked.

But, wait!  I live in Texas. We don't even recognize the word Vegan or Vegetarian.  What would my husband think?  I was getting nervous again.  I then found a website the Happy Herbivore and received a lot of encouragement from friends.  If I could just cut out meat 3 days a week and stop my dairy/alcohol consumption....what would that do for my heart?

So hear we are....Day 1 with encouragement from my husband to participate.  In 3 weeks, I am meeting with my doctor again for a new round of blood work. I have 21 days to see if I can make enough lifestyle changes to prove myself right or wrong.

Tips I learned making Veggie, Bean and Quinoa Croquettes:
  • Prep all you can on Sunday or Saturday for the week. This will save you time and keep you on track with your new diet.
  • Eating healthier is CHEAPER!  Fresh/raw foods are less expensive that pre-packaged, processed foods.
  • Start little and work your way up.  If you can't cut meat out 3 days a week, start with 1 day a week.  Anything is better than nothing!
  • Journal, journal, journal!  How do you feel when you wake up, do you have energy after work, have the headaches and body aches gone away, are you more regular.  Journaling helps you remember the changes!
  • I found quinoa and wheat gluten at my local Target.  (You want to use the gluten, it basically glues the meatballs together.)
  • I use minced garlic in a jar.  It saves me time and my hands no longer smell like garlic for days.
  • I added a pinch of salt, pepper and red pepper flakes to turn the volume up!
  • Cook your quinoa before starting the recipe. Save left overs for later in the week. 1 cup of quinoa goes a LONG way!


Recipe for Veggie, Bean, and Quinoa Croquette (All credit to the Healthy Herbivore)

15oz can of kidney beans, drained and rinsed
1 small onion, minced
1 medium zucchini, minced
1 large carrot, peeled and minced
2 garlic cloves, minced
1 cup of quinoa, cooked
2 tbsp of low sodium soy sauce
1tbsp of yellow mustard
1 tbsp of Italian seasoning
1/2 cup of whole wheat gluten

Heat oven to 350 degrees. Grease a cookie sheet.  In a large bowl, mash kidney beans.  Combine rest of ingredients.  Using your hands, mold mixture into balls.  Place balls on cookie sheet and bake for 25-30 minutes or until brown.  Set aside to cool and firm for 10-15 minutes. Freeze any extras for later in the week.  (I am using mine tomorrow for whole wheat pasta and marinara!)


Monday, May 28, 2012

Oatmeal Banana Nut Bread

I will admit, I am not a baker by heart. The measurements are too exact for me.  In the end, my kitchen looks like a science experiment gone wrong.  But, we had a bunch of bananas that ripened too fast. Heaven forbid, I let them go to waste.

This recipe is extremely easy. You can double it without worry.  The little loaves would make perfect get well, Christmas, Church function gifts.  The sky is the limit.

Tips I learned while baking Oatmeal Banana Nut Bread:

  • Use the disposable tin loaf pans when giving gifts. You don't have to worry about getting them back!
  • Spray your pans with non-stick spray well. This will allow easy removal.
  • Once the bread is done, do not cover it until cooled. This will prevent your loaf from getting soggy on top.
  • If you love to bake, invest in a good mixer. This will make your life much easier.  Cuisinart's are expensive, but well worth it. My mom's mixer is over 30 years old. 
  • Check your bread after 40 minutes. This will prevent over baking.
  • I added cinnamon as a nice little twist.

Recipe for Oatmeal Banana Nut Bread (All credit to All Recipes kel7928)

Ingredients (Makes 1 1/2 loaves)

  • 1/2 cup shortening
  • 3/4 cup white sugar
  • 2 eggs
  • 1 cup mashed bananas
  • 1 teaspoon vanilla extract
  • 1 1/2 cups all-purpose flour
  • 1/2 teaspoon baking soda
  • 1/2 teaspoon salt
  • 1/2 cup quick cooking oats
  • 1/2 cup chopped walnuts

Directions

  1. Preheat oven to 350 degrees F (175 degrees C). Lightly grease a 9x5 inch loaf pan.
  2. In a large bowl, cream together the shortening and sugar until light and fluffy. Stir in the eggs one at a time, beating well with each addition, then stir in the banana and vanilla.
  3. In a separate bowl, sift together flour, baking soda and salt. Beat into creamed mixture. Stir in oats and nuts. Pour into prepared pan.
  4. Bake in preheated oven for 50 to 55 minutes, or until a toothpick inserted into the center of the loaf comes out clean.

Monday, April 23, 2012

The Perfect Grilled Pork Chop

I wish I could take credit for this recipe, but alas I cannot. I saw this on a America's Test Kitchen show. It is so good, that it has become our favorite method of cooking pork chops.  The recipe is so easy, that you are going to think you are cooking it wrong.  Don't worry - you are not!  Pair this with roasted broccoli/bell peppers, green beans, corn or a salad and you have a meal in 1 hour or less.

Tips I learned while cooking The Perfect Pork Chop:
  • Don't skip freezing your chop. This is a crucial step and actually allows the meat to withstand the grill heat longer for a juicier finished product.
  • The butter, brown sugar, salt and pepper amounts depend on your taste buds. They are totally flexible.
  • Always cook with a hot grill. Never put your meat on a cold grill.
  • You can always soften butter in the microwave. Just nuke for 5-10 seconds at a time until softened.

Ingredients:

Bone-in Pork Chops
Butter
Brown Sugar
Salt
Pepper

Line a cookie sheet with foil. Place your defrosted pork chops on foil. Cut to 1/2 inch slices on the outside of the chop. (This will prevent the chop from cupping.) Season with salt to taste and brine. Place in freezer for 20-30 minutes. In a small bowl, combine butter, pepper and brown sugar. Mix well. Heat and clean grill.  Remove pork chops from freezer and top with 3/4 of butter mixture.  Cook on grill, 5-8 minutes on each side.  Remove from heat.  Place remaining butter mixture on cooked pork chops and tent with foil for 10 minutes before eating.

Sunday, April 22, 2012

Swai with Fennel, Tomatoes, and Capers

Wow,  I didn't realize how long it had been since I posted a recipe.  I am still cooking and eating, but haven't blogged in a while. Heath and I are still "trying" to eat healthy. He has lost 20 pounds and I have lost 15 pounds.  Needless to say, I still have a way to go.  Trying to lose the most I can, because in 2 months we are going to start trying for our first baby. To say I am excited is an understatement. I can't wait!

To keep with the healthy theme, we have incorporated more fish into our diet.  I have found that frozen Swai fish is the cheapest. It is has a similar taste as catfish without the bones. It is super easy to cook and works with most fish recipes.  I have also noticed it does not make your house smell "fishy."  It is a wonderful fish to work with if you have been afraid to cook fish in the past.  Try this out and let me know what you think!

Tips I learned when cooking Swai with fennel, tomatoes, and capers:

  • Don't overcook your fish.
  • Olive oil is a great base coat for any topping.
  • Do double duty! Roast your veggies and cook your fish on one dish and at the same time.
  • Fish is great when in a pinch. Quick to defrost and super easy to season.
  • Line your baking dish with foil for quick clean up.
  • Use frozen brown rice for a quick dinner. It takes only 4 minutes in the microwave and serves 2-3 people.

Swai with Fennel, Tomatoes, and Capers

2 pieces of frozen swai, defrosted
1 fennel bulb, diced
1 small onion, sliced
1 can of diced tomatoes (no seasonings)
2 teaspoons of capers, drained
1 teaspoon of garlic
3 tablespoons of olive oil
cooked brown rice
salt
pepper

Directions:

In a medium saute pan, heat olive oil on medium heat.  Add fennel, onion, tomatoes, capers, garlic. Season with salt and pepper to taste.  Simmer for 10-15 minutes until reduced.  Heat oven to 400 degrees.  On cooking dish, line with foil.  Place fish on dish and lightly drizzle with olive oil. Salt and pepper to taste.  Prep asparagus. (See below)  Cook for 10-13 minutes, until flaky.  Place brown rice on plate.  Top with fish. Top fish/rice combo with fennel/tomato/caper mixture.  Add asparagus side.  Serve immediately.


Roasted Asparagus:
1 bundle of asparagus
olive oil
salt
pepper

Directions:

Wash asparagus. Cut the ends, approx. 1 inch from the bottom.  Place on foil dish with fish.  (Separate sides)  Drizzle with olive oil. Season with salt and pepper. Using hands mix well.  Cook in 400 degree oven for 10-15 minutes or until you see nice browning.